The last point you require when you're driving in the rain, snow as well as haze of winter season is dirty car headlights. Cover the hood, bumper, and any kind of exposed paint at the headlight with sheeting plastic or a trash can (the trash bag can be reduced to open for much better coverage). Tape to the car. Use scissors to eliminate the headlight from the plastic bed linen and after that include tape in addition to the plastic around the front lights.
Just use as much pressure as definitely needed. There is no point in eliminating a movie only to have the front lights be scratched as well as harmed. Apply brightening compound - Use the brightening substance with another towel, using small, circular motions. Take your time-- approximately 5 mins per headlight-- to allow the substance to function appropriately.
Arrange Front lights is not working Evaluation.
- The finishing makes a distinction, as well as your lenses will certainly remain clear for approximately two years, and also longer in a lot of cases.
- With a light touch (extremely little pressure), move the sand paper around the lens in a big round pattern while concurrently and also constantly splashing the lens with water.
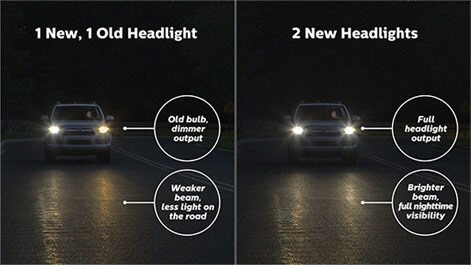
- The lorry can end up being dangerous to drive at night, or might not pass crucial inspections that enable it to be used for a driving test or perhaps to allow it to remain in the road.
- After a short duration, finish the circular pattern as well as relocate to horizontal actions with the sand paper, backward and forward, while still splashing water.
- Prior to you can reach the actual sprucing up of the fronts lights, some light prep is required.
- Luckily, repairing oxidized headlights is usually a task you can do yourself.
Given that you used horizontal strokes with the initial sandpaper grit, then you'll wish to sand diagonally across the headlight for this following one. The last sanding ought to be in the contrary angled activity from the one you just did. Take your time as well as make certain the paper and lens remain damp with water. It was great that I stumbled upon this post as well https://www.datafilehost.com/d/cacd6425 as discovered a few points.

The finish makes a difference, and also your lenses will certainly continue to be clear for approximately 2 years, and longer in many cases. There is a difference in what Go to the website we do contrasted to DIY approaches.
Sand in the same direction during with this very first one. Make certain you keep the surface damp as you function-- otherwise you run the risk of terribly damaging the lens because of grit particle accumulation. Your outcomes will depend upon Click here to find out more how good of a job you carry out in this phase, so don't be afraid to spend 5 to 10 minutes hunched down there. You can additionally separately get the products that would certainly be available in those boxes, which is wise for people that could already have a few of the components. Generally, you need a few various grits of wet/dry sandpaper (1000, 2000, as well as 3000 grit are normally sure things), polishing substance, paste wax, and a UV sealer.